
Imagine this: you’re at a bustling networking event, and everyone’s name tag reads
“Hey You.”
Not very engaging, right?
Well, that’s how generic messages on LinkedIn feel to your potential clients. The pain is real — mass messages without personalization are as effective as shouting into the void.
By integrating powerful tools—Hyperise and Linked Helper—you can send automated messages that feel like they were crafted just for each recipient. Trust us, your clients will notice!
This approach is highly motivating because brands that utilize personalization see 40% more profit than those that don’t. Moreover, 71% of customers expect businesses to provide personalized experiences.
Download Linked Helper 2
and get 14-day free trial right now
DOWNLOADIf you are not yet in our list of users, then join.
We give you a trial version to start your experience with our LinkedIn tool.
Here are the key takeaways
- Personalization is no longer a luxury but a necessity, especially when sending mass communications to B2B leads, clients, CEOs, or influencers.
- You can send personalized mass messages through tools like Hyperise. This includes using custom text strings and adding visuals with dynamic personalization elements, even layers with the recipient’s profile picture.
- Hyper-personalization utilizes AI, Big Data, and real-time data. Hyperise uses the term “hyper-personalization” for adding custom layers to images within messages.
- Hyperise can be tested for 14 days free; afterward, it’s a paid service costing $69 per month.
- You can set up mass email campaigns with personalized images in 10 steps. Detailed tutorials and videos are available below!
Personalization in LinkedIn messaging – meaning in marketing 2024
Since LinkedIn can be your first point of contact with key audiences, it’s crucial to personalize your messages effectively.
It’s important to note that these can be automated mass messages, but each recipient will at least see their name in the message. In the best cases, you can even include a personalized image with a unique text string for each individual.

In 2024, businesses are not just service providers but also trusted allies who understand their clients’ needs intimately. As a true ally, addressing clients by their name and incorporating their personalized interests is essential for engaging them with your products. Research shows that personalization is important in communication for 54% of people.
As LinkedIn doesn’t offer in-depth personalization by default, we recommend using Linked Helper for automation. This tool allows you to use custom variables and integrates with third-party services like Hyperise, enabling you to use personalized images in your messages.

Personalization in LinkedIn communication is vital
In conducting account-based marketing (ABM), deep personalization on LinkedIn allows you to tailor your approach to each target account, increasing the effectiveness of your campaigns.
- LinkedIn allows you to directly reach decision-makers and influencers. Think about how full their inboxes must be. If you’re using social media to connect with target leads, standing out from generic messages is crucial. Your chances of standing out increase significantly if your message includes a banner image with a personalized message using their profile data.
- Good for InMails. When using InMail outreach, it’s crucial to show that your message is not spam. Demonstrate detailed interest and careful study of the recipient’s profile in your first message. Built-in personalization helps achieve this.
- Personalized messages are more likely to generate responses. If your message resonates with the recipient and piques their interest—something easily achieved with personalized images—you’re more likely to get a response. This boosts your social selling score on LinkedIn.
- Tailored interactions help build stronger relationships with key stakeholders. Personalization not only makes a great impression on those unfamiliar with you but also helps maintain a friendly connection with your audience through improved follow-up and retention.
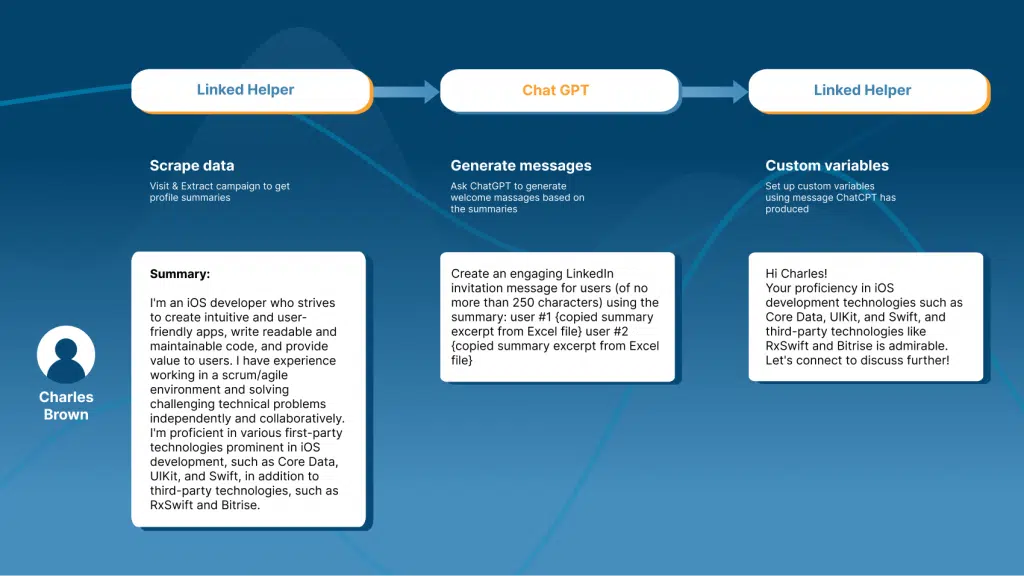
How personalization works in Linked Helper
In Linked Helper, image personalization works through the third-party service Hyperise. It has a built-in direct integration. To support sending personalized images, you need to purchase a subscription.
Hyperise – What it is and pricing
Hyperise can really transform the way you do LinkedIn outreach.They have a free 14-day trial with no credit card required, which is perfect for getting started.

Hyperise provides a lot of cool personalization features. For instance, you can personalize images, websites, and even videos. Their basic plan starts at $69 per seat monthly and includes unlimited image designs, access to over 100 stock templates, and up to 5 active images with 5,000 image views. This plan is optimal if you will use it only for LinkedIn personalized messages.
On LinkedIn messages you can customize images with things like adding the prospect’s first name, company name, job title, or even their profile image.
You can also include business logos, website screenshots, pinned map locations, personalized QR codes, and even augmented reality markers for dynamic GIFs.
How to attach personalized images to LinkedIn mass messages

Here’s a step-by-step guide to create a LinkedIn campaign using Linked Helper, with a follow-up message featuring a custom Hyperise image:
1. Set Up Your Campaign
Choose a campaign template from Linked Helper. Your message with a custom Hyperise image will be sent as a follow-up.
2. Gather Your Audience
Define your target audience. These could be people outside your network who will receive your message once they accept your connection request. Use LinkedIn filters or Sales Navigator to find the most suitable profiles. Remove any irrelevant profiles to refine your list.
3. Customize Your Message Template
Select Hyperise for your message template. Add the Hyperise plugin to include personalized images in your messages.
4. Create a Hyperise Account
Sign up for Hyperise. You can use it for free for 14 days to test your personalized image campaign.
5. Design Your Creative in Hyperise

Create your image in Hyperise. You can choose from many templates or upload your own visuals. Use the editor to tweak your image, remove backgrounds, add elements, and include custom layers like the recipient’s profile picture.
6. Get the Code for Your Linked Helper Campaign
Once your graphic is ready, get the personalized link to your template. This link is specifically designed for Linked Helper. Copy and paste this link into your Linked Helper campaign settings.
7. Set Up Custom Variables in Linked Helper

After inserting the link, you will see your creative in the message template. You can select custom variables, including the recipient’s profile photo.
8. Download and Re-upload CSV with Variables
Download the CSV file with the list of recipients by clicking a button in the campaign queue. Re-upload the CSV file to use it as a source for the variables, which will include the profile photo URL.
Note: If you use personalization with the recipient’s profile photo and some are missing the photo, it’s best to exclude those profiles from your campaign. Use LinkedIn filters to do this.
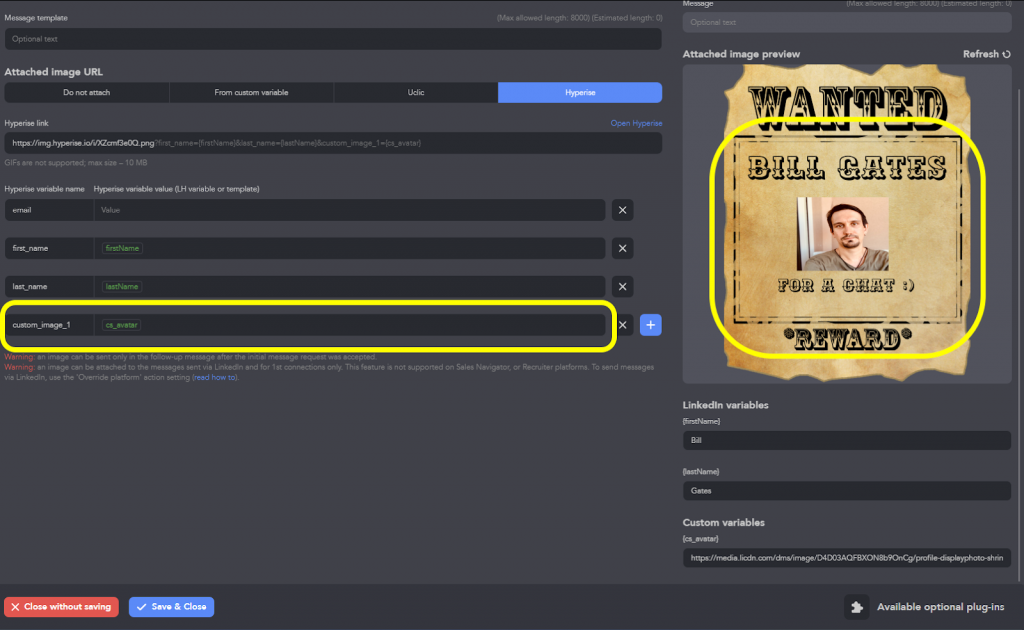
9. Map Hyperise and Linked Helper CSV Variables

In Hyperise, match the required variable in the CSV file. In this example, it’s the cs-avatar containing the profile photo URL.
Preview the message by inserting one of the profile photo URLs from the CSV file into the preview settings.
You will see a beautiful template with the recipient’s profile photo.
10. Launch the Campaign
You’ve successfully created your creative template and mapped the variables between both services. If you initially chose an invite campaign, Linked Helper will first expand your network and then send your personalized message.
Outcome

Such a message is likely to gain approval and admiration because it appears meticulously crafted, showing that you’ve paid attention!
Which means the rest of your text is more likely to be read.
Video Tutorial
For a visual guide, check out this video tutorial:
Benefits of hyper-personalization with Linked Helper
Hyperise can be integrated with various tools for personalizing LinkedIn messages, not just Linked Helper.
However, the quality of mass message delivery may vary depending on the tool you choose. Here’s an in-depth comparison of Linked Helper with its competitors based on our research:
- Enhanced Targeting – Linked Helper allows you to gather leads from any page in your campaign, unlike some other tools which may not have this capability. It can collect leads from followers, following, people you may know, and those who engaged with your posts through likes and comments.
- Security – Some tools, like OctopusCRM, are browser extensions, while others are cloud-based. Both types are less secure and more likely to be detected as automation compared to Linked Helper, which operates as standalone software based on a browser.
- Message Sources – Hyperise personalization with Linked Helper works for first-degree connections, follow-ups, group messages, and event messages. Other tools often lack the ability to send mass messages through shared groups or events, reducing the potential reach.
- Cost – Linked Helper is more cost-effective compared to other tools, which often offer less functionality at higher prices. For example, Linked Helper subscriptions start at $15 per month for the standard plan, while Expandi starts at $99, and Zopto goes as high as $195.
For detailed comparisons, you can read the following articles.
By choosing Linked Helper, you ensure better targeting, enhanced security, broader functionality, and cost savings. Hyperise integration adds a layer of deep personalization, making your campaigns more effective and engaging. For more detailed comparisons, you can explore the links provided above.
3 Personalization examples and tips 2024
#1 Insert profile photo
As discussed earlier, using profile photos in your messages is a highly effective way to capture attention. Everyone appreciates personalized attention, and incorporating a recipient’s profile photo builds trust on a psychological level.
This technique makes your message appear technically sophisticated and intriguing. Not everyone knows about services like Hyperise that offer such templates, which adds an element of surprise and interest.
#2 Use Reference to Post/Profile Info
Beyond including a recipient’s name, job title, or location, you can personalize messages with specific details from their profile. For example, referencing their latest post, article, or other profile information can be particularly effective.
This approach is especially useful for reaching out to high-level professionals who frequently receive numerous direct messages. Such detailed attention can help your message stand out and feel more relevant to the recipient.
#3 Personalized Event Ticket
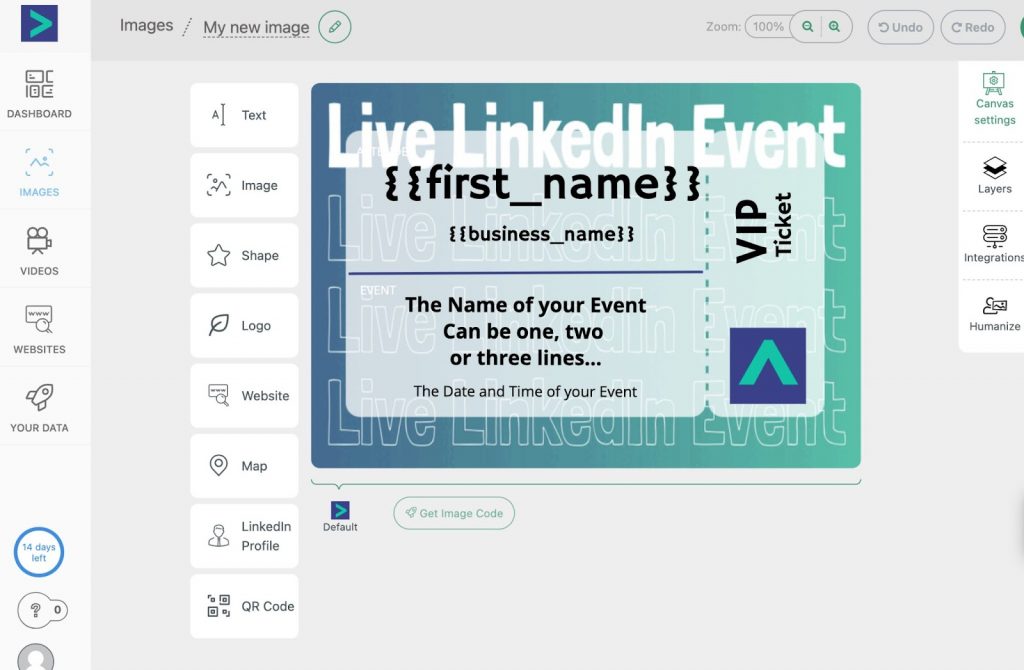
Using a template from Hyperise, you can create personalized event invitations for both online and offline events. This approach is perfect for warming up your audience before organizing a Live event on LinkedIn. A personalized invitation is likely to attract more participants as it feels more exclusive and engaging. This technique ensures higher attendance and interaction at your events.
Integrating these personalization techniques into your LinkedIn outreach can significantly enhance your engagement and response rates.
3 Tips to create personalized images
1. Continuously Test Different Elements
Experiment with various elements in your images to determine what resonates best with your audience. Some messages might perform better with images, while others may benefit from personalized text lines from the recipient’s bio, or references to their posts or articles. Conduct A/B testing to find the most effective approach.
2. Incorporate Personal Data
Utilize personal data to tailor your images specifically to each recipient. For example, include their name, company logo, or a relevant statistic that pertains to their industry. This level of personalization can make the recipient feel valued and increase engagement.
3. Tools Checklist for Creating Images
- AI Tools: Use AI-powered tools like MidJourney to create stunning visuals, from realistic portraits to futuristic landscapes. Hyperise allows for the integration of such custom graphics.
- Canva: Canva is an excellent tool for custom designs. You can start your design in Canva and then enhance it in Hyperise with personalized elements.
All in all – Personalization and customer experience
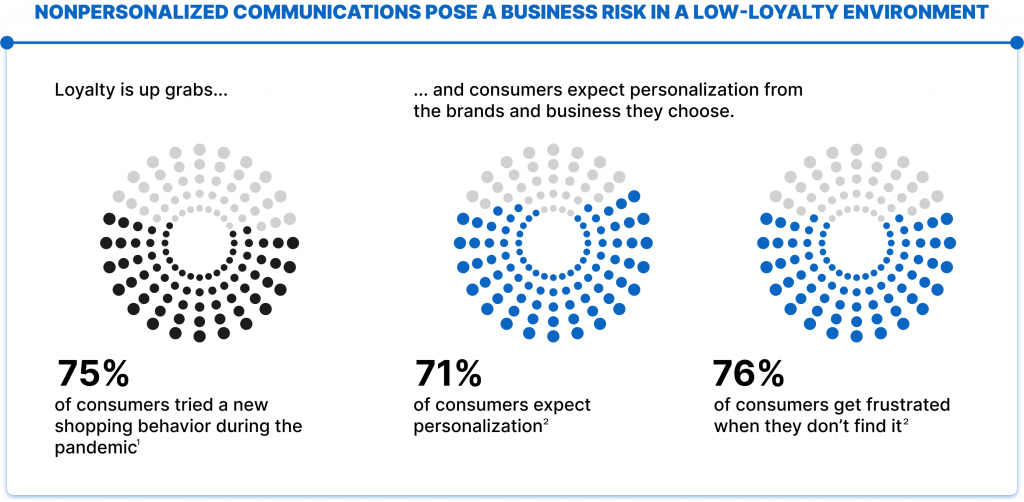
Personalization in customer experience plays a crucial role in building stronger relationships, enhancing engagement, and increasing conversion rates. Research indicates that 76% of users are disappointed when they encounter non-personalized experiences.
In LinkedIn communication, especially in B2B relationships, direct interaction often occurs between representatives, such as salespeople and distributors. This direct engagement underscores the importance of tailored communication for effective relationship building.
Personalization can be broadly categorized into two types:
- Traditional Personalization: Involves using customer names, customized message lines, location-based content, and other personalized factors.
- Hyper-Personalization: Utilizes real-time user data, online behavior analytics, Big Data, or AI to deliver highly customized experiences that go beyond surface-level details.
When discussing personalized images in LinkedIn messages, services like Hyperise may refer to this as hyper-personalization, but it typically aligns more closely with traditional personalization methods, focusing on incorporating specific customer details into visual content.